Rice Krispie Treat Pumpkins – Festive Halloween Fun
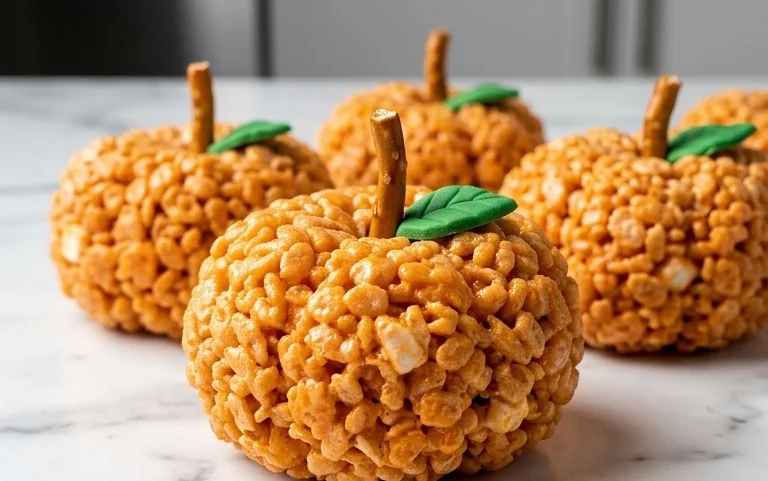
Rice Krispie Treat Pumpkins are the ultimate no-bake Halloween delight, and I can’t wait to share how we make these festive little guys! There’s something undeniably magical about transforming simple, everyday ingredients into a classic treat that brings smiles to faces of all ages. We all have those nostalgic memories tied to Rice Krispie Treats, right? They’re the perfect balance of chewy, sweet, and crispy, making them an instant crowd-pleaser. But what makes these Rice Krispie Treat Pumpkins truly special is their vibrant orange hue and adorable pumpkin shape, instantly embodying the spirit of autumn and Halloween. They’re so incredibly easy to whip up, making them an ideal activity for families to do together, creating cherished memories alongside delicious treats. Get ready to impress your trick-or-treaters or liven up your next fall gathering!
Rice Krispie Treat Pumpkins
Get ready to fall in love with these adorable and delicious Rice Krispie Treat Pumpkins! They’re the perfect festive treat for Halloween parties, classroom celebrations, or just a fun afternoon activity with the kids. Imagine those classic, gooey Rice Krispie squares transformed into charming little pumpkins, complete with a Rolo stem and a green M&M leaf. They’re surprisingly easy to make and are sure to be a hit with everyone who takes a bite. Plus, the process of coloring and shaping them is half the fun!
Ingredients:
- 1/4 cup Butter
- 1 bag large marshmallows (approximately 40 marshmallows)
- 6 cups Rice Krispies cereal
- Red & Yellow Liquid Food Coloring
- Mini Rolos (one per pumpkin)
- Green M&M’s (one per pumpkin)
- 1/4 cup cooking oil or melted butter in a small bowl (to keep it from sticking to your hands)
Instructions:
1.
Preparing the Pumpkin Base
Start by lining a 9×13 inch baking pan with parchment paper or aluminum foil. You can lightly grease this with butter or cooking spray to prevent sticking, though the cereal itself has some stickiness. In a large saucepan or pot, melt the 1/4 cup of butter over low heat. Once the butter is completely melted and no longer foamy, add the entire bag of large marshmallows. Keep the heat on low and stir constantly. It’s crucial to stir gently and continuously to prevent the marshmallows from scorching on the bottom of the pan. You want them to melt slowly and evenly, creating a smooth, gooey mass. This process usually takes about 5-7 minutes. Don’t rush this step, as burnt marshmallows can ruin the flavor of your entire batch. You’re looking for a smooth, creamy consistency with no lumps of marshmallow remaining.
2.
Adding the Color and Cereal
Once the marshmallows are completely melted and smooth, remove the saucepan from the heat. Now for the fun part – coloring! We’re aiming for a pumpkin-orange hue. This is where the red and yellow liquid food coloring comes in. Start by adding just a few drops of yellow food coloring and stir it in thoroughly. You’ll notice the mixture will turn a bright yellow. Then, gradually add a few drops of red food coloring, stirring after each addition, until you achieve a vibrant, pumpkin-orange color. Be mindful not to overdo it with the food coloring; you can always add more, but you can’t take it away! Once you’re happy with the color, it’s time to add the Rice Krispies cereal. Add the 6 cups of Rice Krispies to the melted marshmallow mixture. Gently fold the cereal into the marshmallow mixture using a large spatula or spoon. Continue folding until all the cereal is evenly coated with the marshmallow. Make sure you get all the dry bits incorporated.
3.
Shaping Your Pumpkin Treats
This is where your hands will get a little messy, and that’s where the cooking oil or melted butter comes in handy. Pour the cereal mixture into your prepared baking pan. Before you start pressing, grease your hands generously with the cooking oil or melted butter from the small bowl. This will prevent the sticky marshmallow mixture from clinging to your skin. You can also use a greased spatula or the bottom of a greased glass to press the mixture down. Now, begin to shape the mixture into pumpkin-like rounds. You don’t need to make them perfectly spherical; slightly flattened mounds work best. Aim for a size that’s easy to hold and eat, perhaps about 3-4 inches in diameter. As you shape, try to keep the thickness relatively uniform so they cook or set evenly. You can make them as big or as small as you like, but remember that smaller ones are easier to manage. You can also create little indents on the top to mimic the natural shape of a pumpkin.
4.
Adding the Stems and Leaves
As soon as you’ve shaped a pumpkin round, gently press a mini Rolo candy into the center of the top to serve as the stem. The warmth of the Rice Krispie treat will help the Rolo adhere nicely. For the final touch, place a green M&M next to the Rolo stem to resemble a little pumpkin leaf. You’ll want to do this while the treats are still warm and pliable, as they will harden as they cool, making it harder to insert the Rolo and M&M. Work quickly but carefully. If the mixture starts to cool down and become too firm to shape or press the Rolo into, you can gently rewarm the saucepan over very low heat for a minute or two, stirring constantly, to soften it up again. Just be cautious not to overheat.
5.
Setting and Enjoying
Once all your pumpkin treats are shaped and decorated with their Rolo stems and M&M leaves, allow them to cool completely at room temperature. This will take about 30-60 minutes, depending on the thickness and your room temperature. Resist the urge to try and speed up the cooling process by putting them in the refrigerator, as this can sometimes make them too hard and brittle. Once they are firm and set, you can carefully lift them out of the pan using the parchment paper or foil. They are now ready to be enjoyed! You can store any leftovers in an airtight container at room temperature for up to three days. These are fantastic for a Halloween party platter, as individual party favors, or just a fun treat to make at home. The combination of the sweet marshmallow, crunchy cereal, and the caramel from the Rolo is absolutely irresistible. Happy haunting and happy treating!

Conclusion:
Making these adorable Rice Krispie Treat Pumpkins is such a fun and rewarding activity, perfect for getting into the autumn spirit! This recipe is wonderfully simple, making it an ideal project for bakers of all ages and skill levels. The combination of gooey marshmallows, crispy cereal, and a touch of festive orange makes for a delightful treat that’s as visually appealing as it is delicious. They’re a fantastic alternative to traditional pumpkin carving, offering all the charm with none of the mess!
These little pumpkins are incredibly versatile. Serve them as a sweet treat at Halloween parties, classroom celebrations, or simply as a special after-school snack. They also make charming edible decorations for your fall dessert table. For variations, consider adding a pinch of cinnamon or nutmeg to the cereal mixture for a warmer spice note, or drizzling them with melted chocolate for an extra decadent touch. Don’t be afraid to experiment with edible googly eyes or candy corn for added personality!
I truly encourage you to give these Rice Krispie Treat Pumpkins a try. They’re guaranteed to bring smiles and a taste of autumn joy to your home. Happy baking!
Frequently Asked Questions:
Can I make these Rice Krispie Treat Pumpkins ahead of time?
Yes, absolutely! You can prepare the Rice Krispie treats a day or two in advance. Store them in an airtight container at room temperature. For the pumpkin shapes, it’s best to form them closer to when you plan to serve them to ensure they hold their shape well.
How can I make the pumpkin stems look more realistic?
For more realistic stems, you can use green candy melts or frosting. Simply melt the candy melts or prepare your frosting, then pipe or carefully shape small strands onto the top of each pumpkin. Alternatively, small pieces of pretzel stick can also work as a quick and easy stem.
My Rice Krispie Treat Pumpkins are too sticky, what went wrong?
The stickiness usually comes from not melting the marshmallows completely or using too much butter. Ensure your butter is fully melted and the marshmallows are melted down until smooth and gooey before adding the cereal. Greasing your hands or using a buttered spatula when shaping also helps significantly.
Rice Krispie Treat Pumpkins
Adorable and easy Rice Krispie Treat Pumpkins perfect for Halloween or fall festivities. These no-bake treats are shaped like pumpkins and decorated with candy.
Ingredients
-
1/4 cup Butter
-
1 bag large marshmallows (approximately 40 marshmallows)
-
6 cups Rice Krispies
-
Red & Yellow Liquid Food Coloring
-
Mini Rolos
-
Green M&M’s
-
1/4 cup cooking oil or melted butter
Instructions
-
Step 1
Melt butter in a large pot over low heat. -
Step 2
Add marshmallows and stir until completely melted. -
Step 3
Remove from heat. Stir in red and yellow food coloring until desired pumpkin orange color is achieved. -
Step 4
Add Rice Krispies cereal and stir until well coated. -
Step 5
Grease your hands with cooking oil or melted butter. Shape the mixture into small pumpkin shapes. -
Step 6
Press a mini Rolo into the top of each pumpkin to create a stem. -
Step 7
Use green M&M’s to create a small leaf or vine at the base of the stem.
Important Information
Nutrition Facts (Per Serving)
It is important to consider this information as approximate and not to use it as definitive health advice.
Allergy Information
Please check ingredients for potential allergens and consult a health professional if in doubt.